Press Kit Wiki

Hurtworld Update #78

Mils

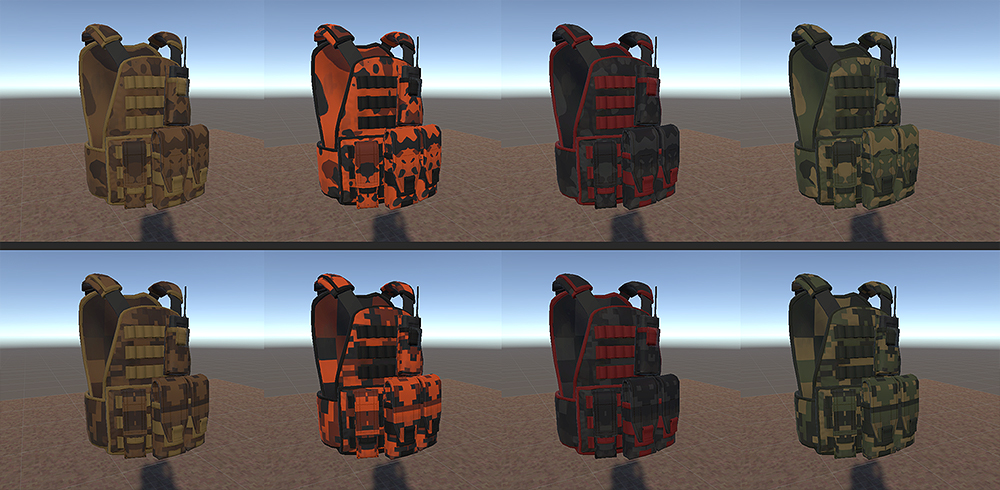
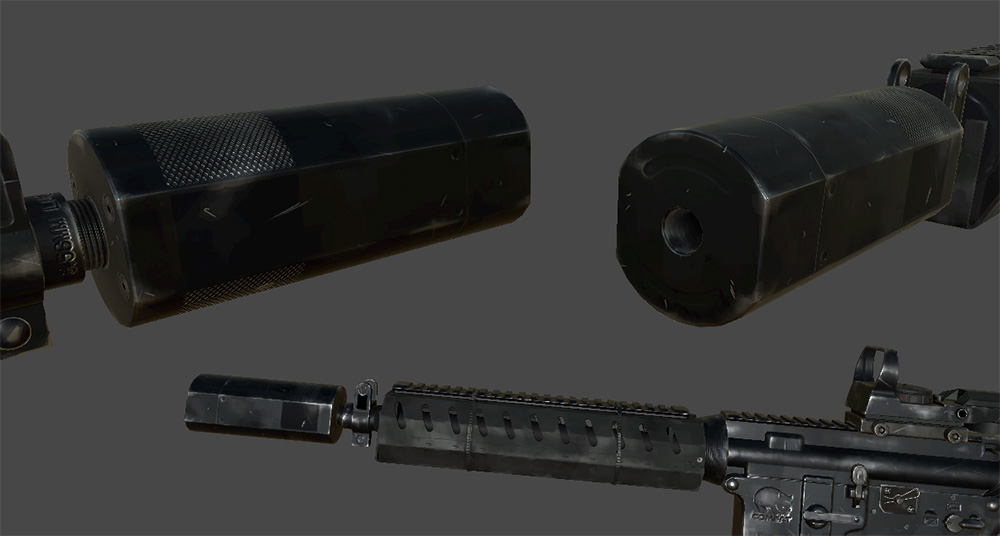
I got a lot done this week, I finished the Red Dot sight, which is one of my favourite sights in any game that uses it. With it’s thin bezel for maximum viewing and active anti occlusion, this sight will be a staple for most players. A lot of the silencers and sights will be interchangeable between the various guns which means we get a lot more use out of these items. Red Dot on a bow maybe? 😛

Dappler_0000_Layer 2

Next on the menu is the thick stubby silencer which really gives a meaty feel to the end of the gun. I’m really starting to get in the groove making items now, and the process is speeding up. I’ve started working on another stock for the AR15, then I’ll do another tip/muzzlebrake. After that Spencer has requested I move onto the Sniper Rifle.

Quash_0001_Layer 1

TEHSPLATT

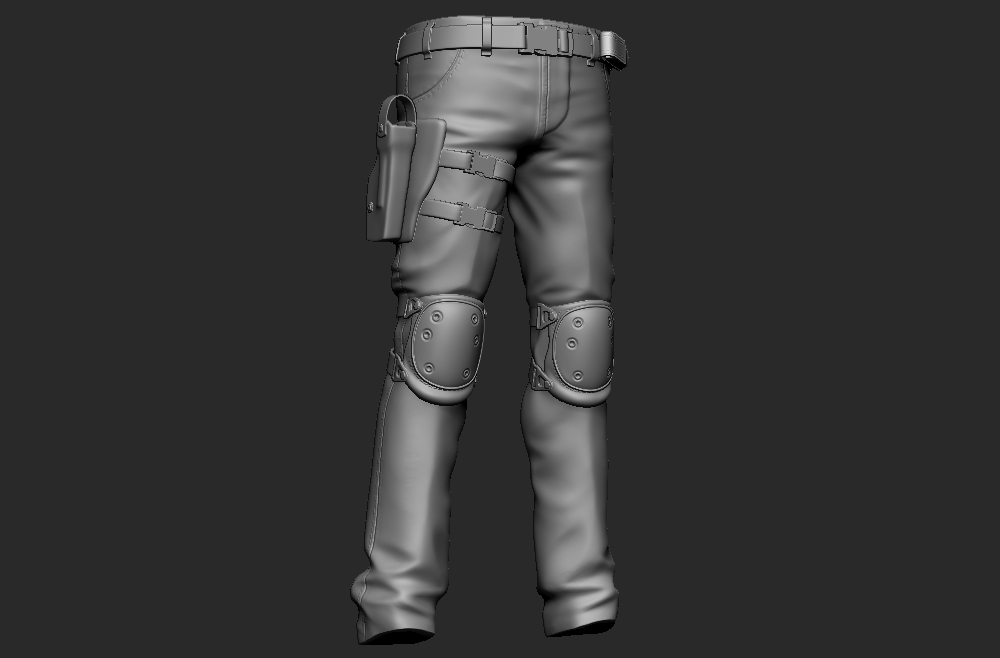
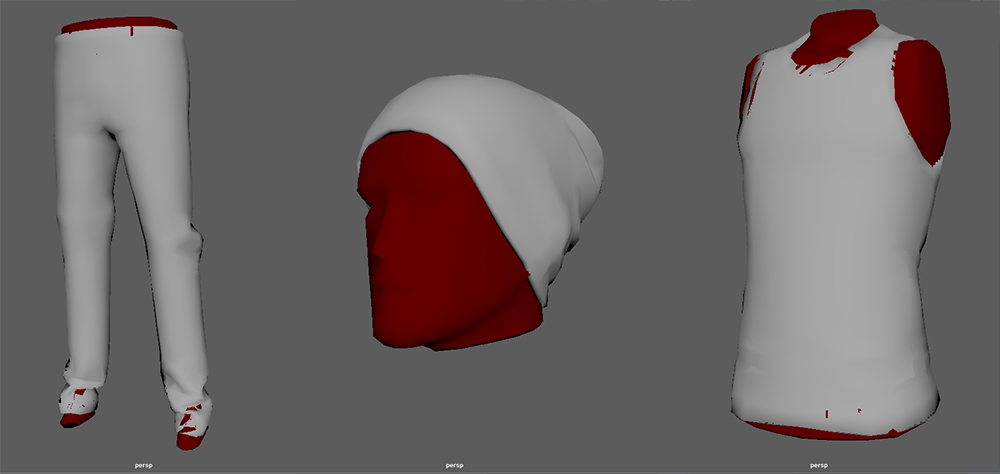
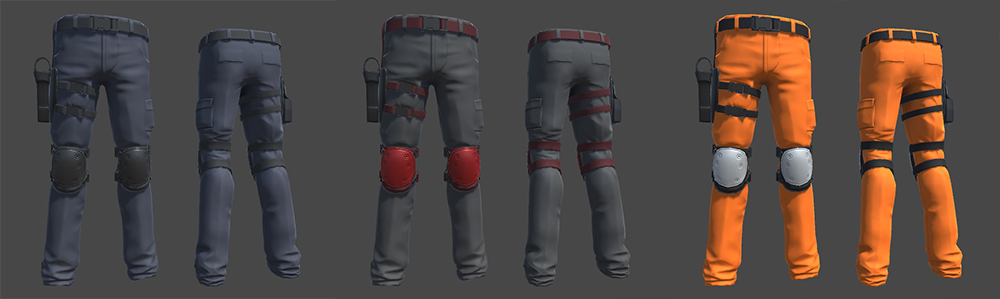
With my workflow now sorted I’ve managed to get a more time consuming asset than the vest to the same stage in half the time which is great progress. When it comes to games, pants can be tricky to get right, too much detail and they are distracting, not enough detail and they are boring. I like having noisy areas around the knees and ankles and relatively smooth areas in between so the players eyes have a place to rest. Some different materials were added to the pants to break up the generally flat, boring specular reflection that fabric has, there’s still some tweaks I want to do to the make certain things pop better like the belt clips. Everything baked out nicely and I didn’t run into any problems, Substance Painter definitely makes the baking process much easier with it’s “By Mesh Name” feature that allows you to bake perfectly without a cage. All in all I’m pretty happy with the outcome.

Set_Military_Pants_Draft2

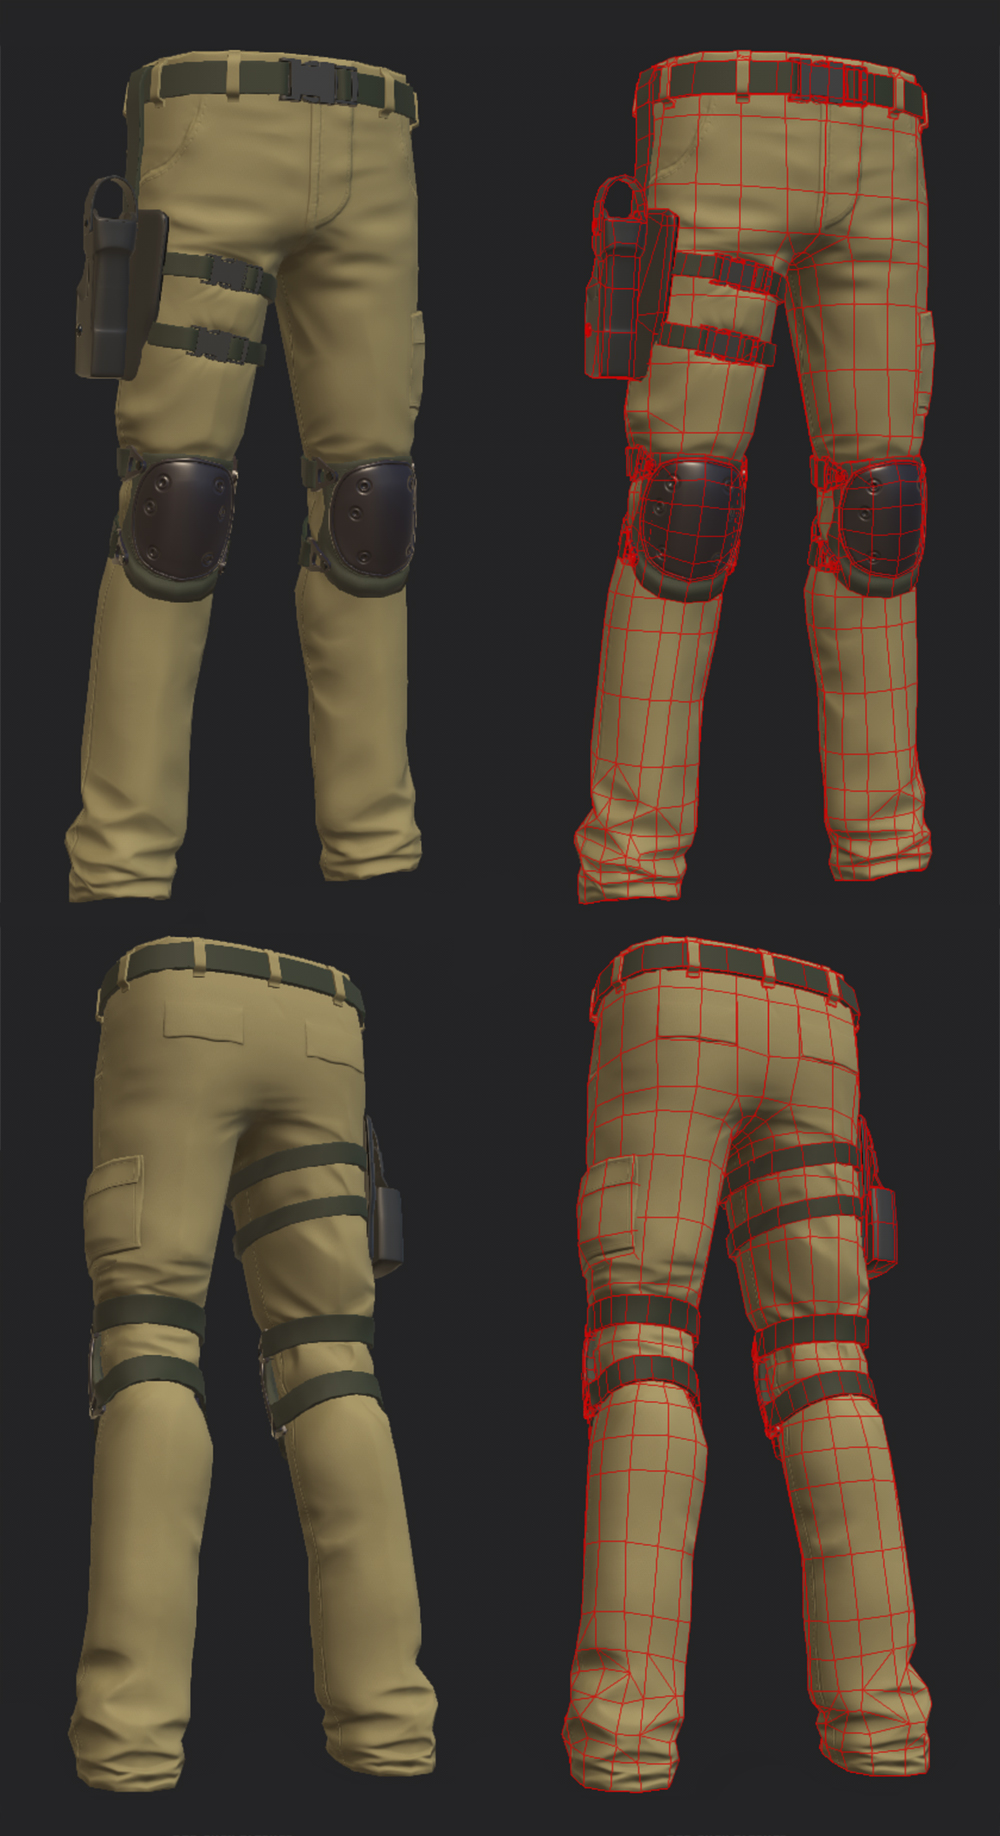
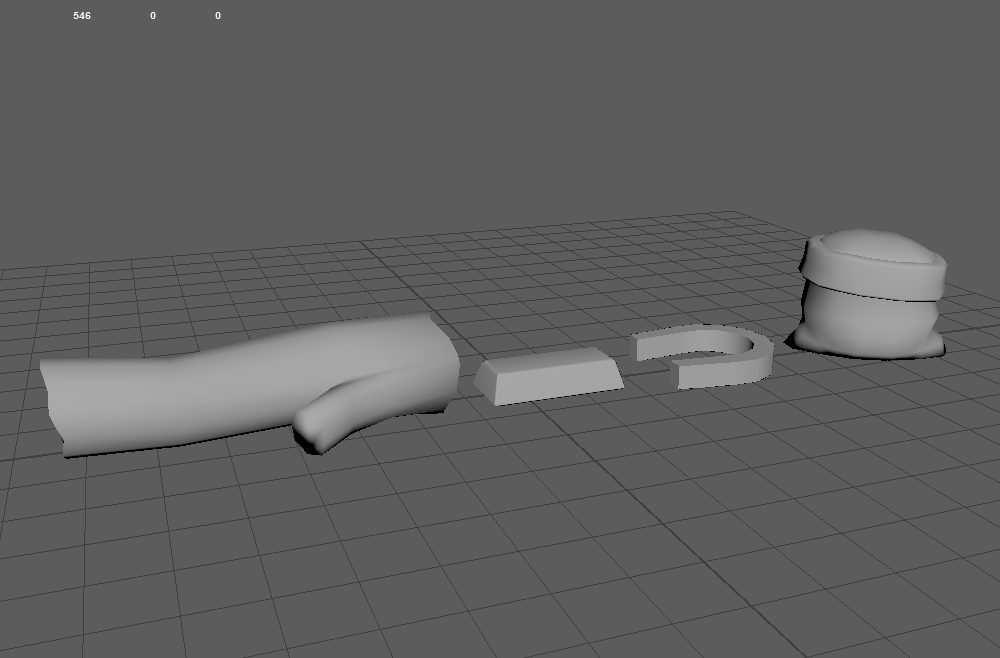
Here’s the pants in Unity (these screen shots are using Unity’s standard lighting not Hurtworld lighting) with the RGB mask shader, there’s a bit of trial and error that goes into figuring out which parts would be best left untouched. I haven’t done a dirt/damage layer yet, they possibly don’t need it, although I have found that dirt layers that look good on coloured assets look terrible on full white assets so that’s something for me to keep in mind. The next step will be testing out some cool patterns and designs to use with the colour masking.

Set_Military_Pants_RGBMask1

Cow_Trix

Hey folks. This week I’ve been continuing work on multi slot items, fixing up bugs, making everything a bit smoother and also playing around with changing slot sizes and the UI a bit.

Something we’ve realised with UI design is that scrollbars suck, and if possible we should try to get rid of them from the UI. We’ve been looking at reducing the inventory grid size by about 25%, which has worked pretty well. Icons are still readable, and it means you can get much wider view of what is in an inventory. Inventories can also take up far less room on the screen. Then, for more important items like the things you have in the hotbar, we can have a larger slot that shows the item in more detail.

I changed up a lot of stuff around dragging items between slots, so the expanding circle is now dead. We changed over to just dragging the icon itself, which gives a more tactile feel to things. I’ve also been playing around with some slot decorators to quickly show item rarity, which currently is some colored borders to a slot. These are a bit ugly right now, but work pretty well when it comes to actually identifying items.  Check it out below.

The workflow around setting up poses for different icon aspects is a bit messy right now, so that needs to be cleaned up. Basically, you need to be able to pose the item differently for if you want a 1:1 icon vs, say a 1:2 icon. Originally I put that information in the item component, but it needs to be moved out somewhere else now. Then, after that I’m onto a new type of machine! More info on that soon.

Tom

I’ve been continuing work on the mesh combining / baking system and improving the model viewer. The idea of the model viewer is to have a way to preview assets in our SDK and have them look as close to in game as possible. It sounds simple but quickly gets complicated as we use several third party plugins and assets in our rendering pipeline that whilst we have a license to publish them with our game, we don’t have a license to redistribute them through our SDK.
This means we can’t perfectly recreate in game lighting conditions in the SDK so instead I created a lighting snapshot asset that creates a skybox from the surrounding level geometry, a reflection probe from the in-game skybox and captures the current directional and ambient light settings.
All lighting snapshots are selectable for preview within the model viewer.

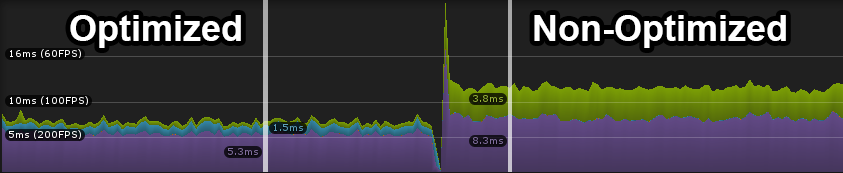
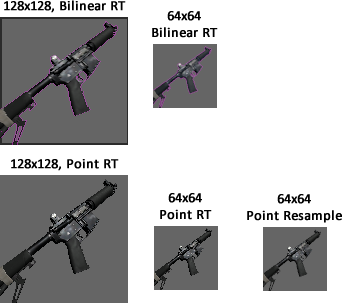
To build the skybox I used render textures where rather than drawing to the screen you draw onto a texture.
Whilst I was experimenting with render textures I Implemented a technique where rather than draw directly to the screen you draw onto a render texture first then draw the texture to the screen.
This sounds like useless busywork but its power is that we control the size of the render texture and it doesn’t have to match the screen.
This should allow our players near the minimum spec to squeeze a bit of extra performance out and people with beasts can render at a higher resolution and downsample back to their screen (which gives a smoothing effect like anti-aliasing).

RenderScaling

I’ve also been keeping my ear to the ground listening and watching for bugs and exploits. After putting the finishing touches on the mesh baking I’ll be moving onto fixing issues in the live game with a small patch.
If you know how to reproduce any bugs or exploits you can help me out and report them at tom@bankrollstudios.com

Spencer

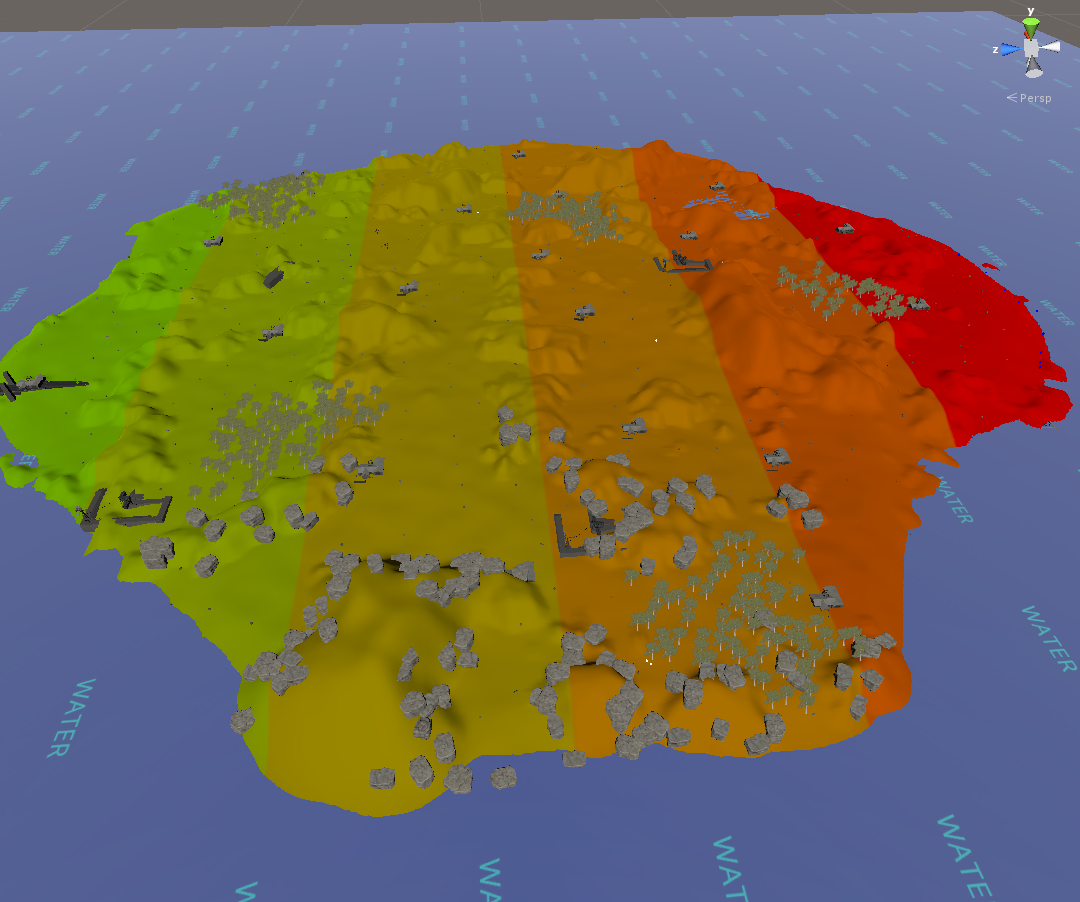
This week I’ve been cutting our content design back down to a manageable size so we can get a survival build out onto the experimental branch. My dreams of infinite procedural progression tiers have been put on hold for now. I got a bit ahead of myself attempting to re-define the survival genre and lost sight of our original goal for ItemV2:

“Rebuild our content progression to be well balanced for full loot”.

This alone is a pretty big change that will need careful refining, and adding completely procedural loot for everything, procedural creature generation, infinite tiers of progression and procedural maps into the mix has pushed us into a very long development cycle. While all these systems are somewhat working, configuring them has proven to be a much harder task than I imagined. All these systems will make it into the game one way or another, we will be releasing them in baby steps as not to loose sight of the parts of the game that worked so well in the first place.

The Plan
The only really crucial feature of ItemV2 for survival is that things are crafted using blueprints. As I have gone off the concept of everything you craft requiring blueprints found in the world, we need a way to keep the semantics of this without actually gating the crafting of items until you find a blueprint. If we take the finding of blueprints off the table for a second, we have a pretty simple solution, allow the creation of base level blueprints by the player and keep the rest of the workflow the same. If creating blueprints only to be able to craft them seems like it doesn’t make any sense, I can see why, it will make much more sense when playing it.

What this creates is players always having the ability to progress any item slot they need without waiting for an item drop. If we re-introduce rare blueprints at this point, we can now make them much less common as players aren’t at all dependent on finding them to progress. Blueprints found in the world can be upgraded versions of the base level blueprints the player can create on demand and will always provide aesthetic and stat bonuses over their default counterpart, maintaining the feeling of finding rare loot without overloading the player with trash blueprints they don’t need.
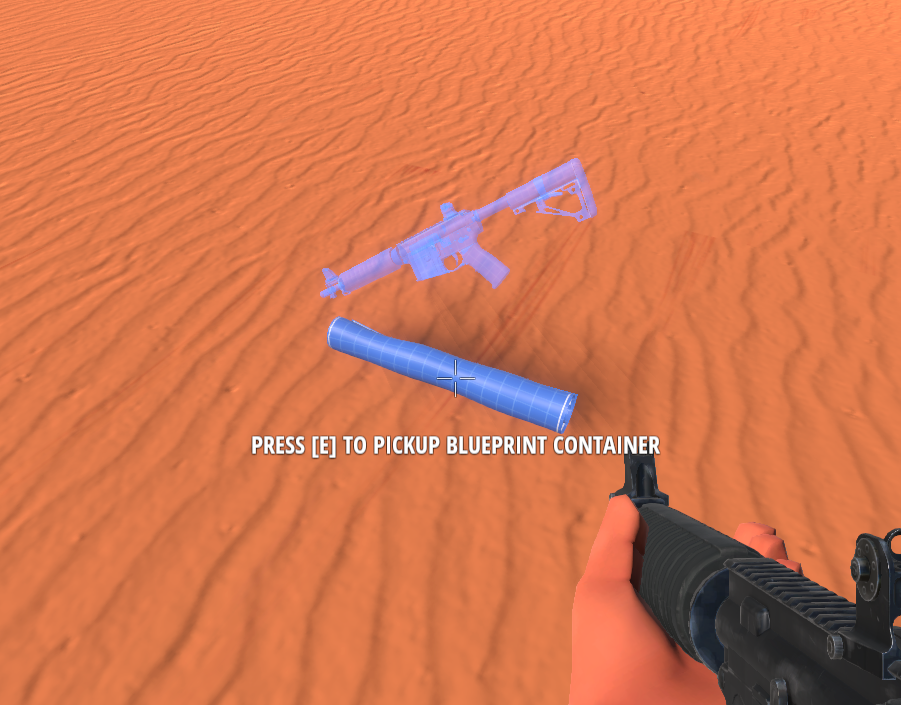
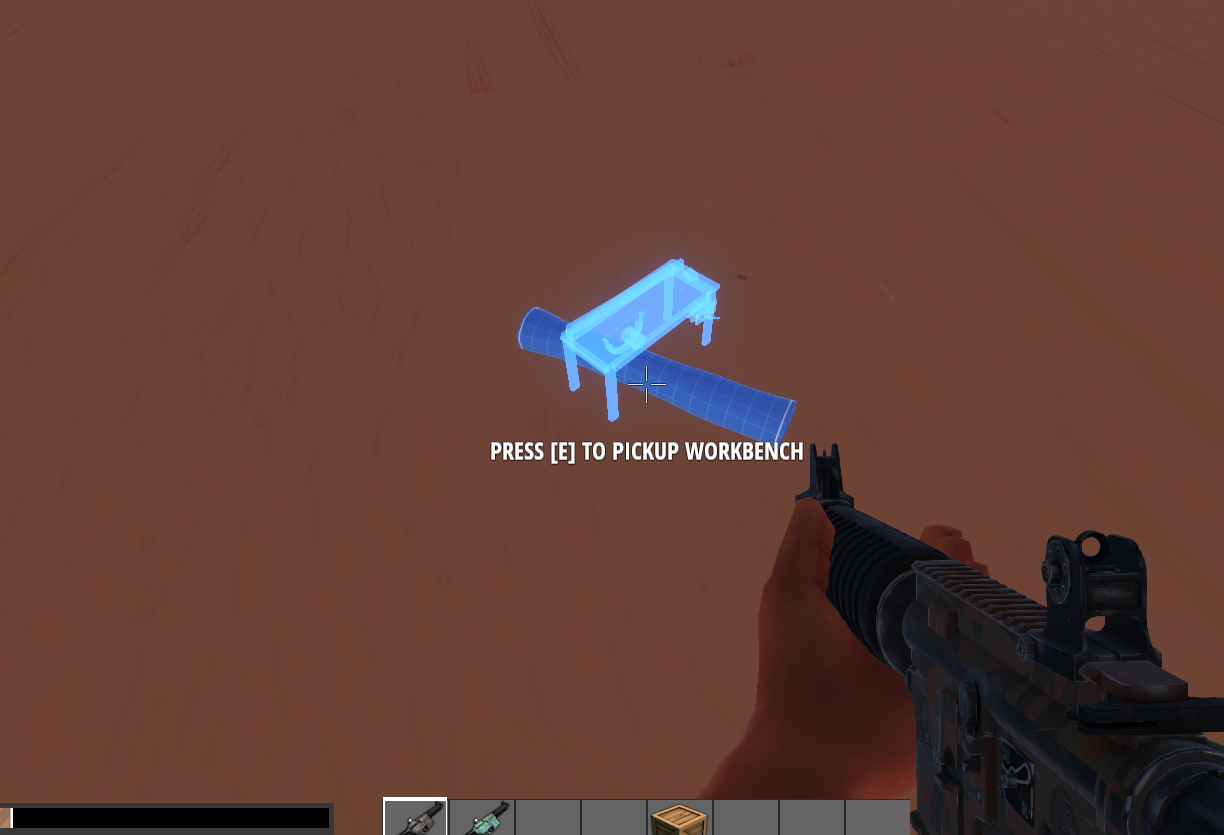
The Drafting Table
This brings me to our new machine, the drafting table. Its role is to both allow the creation of base level blueprints at any time for little or no cost, and to reveal the contents of rare found blueprints. The revelation of found blueprints is designed to shift the loot discovery point from when you are out in the world in danger of being killed, to when you are safe inside your base and can actually pay attention to the rare item you have discovered. Found blueprints will only tell you the class and rarity of the item the blueprint is for when initially looted, only giving you a hint of what you will get.

when Update.
Soon.

Hurtworld Update #77

TehSplatt

This week we ran into some road blocks with the geometry that caps the open ends of items, it wasn’t doing it’s job as well as we originally hoped and the next best solution involves a bit of back tracking so while a good solution is in the works I moved on to a set of matching pants for the vest, they are still in the early stages but are looking decent at this point. A lot of different materials have been added to break up the the monotony that would occur in game had they just been a basic set of pants with a camo pattern on them. Adding in lots of different materials takes full advantage of our PBR set up and adds contrast to materials with dull specular reflections like fabric, this needs to be done due to the fact we can’t fully represent fabric with something like a knitted style pattern in the normal map as this would become far too noisy visually.

Military_Set_Pants1

I also made a small start on some of the non-equippable items, due to these items being world items as well they need to make sense rolling around on the ground. They are also have a very low triangle count and will need to be very easily readable at small sizes, which will definitely create interesting challenges for some of the items that need to be done. From left to right: Tree Branch, Ingot, Magnet, Seeds.

Nonequippableitems

Cow_Trix

Hey folks. This week I’ve been implementing multi slot items, which is coming along nicely. You might have seen multi-slot items in other games like Diablo. For us, they serve a two main purposes. They create a configurable cost of storage – similar to mechanism like encumbrance and item weight – which gives us an interesting design tool to play with. They also let us show off the new icon rendering a bit more and gives cool items like gear and weapons way more space to show themselves off in the inventory.

The extensions has been pretty simple, but there have been some interesting gotchas I’ve run into which I’m working on solution to. An item can now have a size, which is a whole number between 1 and whatever – although it will probably be an absolute maximum of 3 in practice. For instance, I’ve made the AR15 have a 3×1 icon. When in your hotbar, however, it’s smart enough to go back to a 1×1 icon.

I also added an item movement visualisation, that shows where you’re telling the game to put an item while you’re dragging it. This made it a lot easier to figure out what was going on, especially when you had started dragging the item from like the bottom right cell and it was offset.

I’m still figuring a few things out with design, and finding all the places in our code where we’ve assumed that items are handled a certain way. For instance, if you drop a multi-slot item over a bunch of smaller items, you would probably expect the one item to swap places with the many, but only if there’s room. Check out a cool gif of playing with the new inventory stuff below!

Mils

I had some holidays last week, so only worked a couple of days, but I managed to get an item finished and one halfway there. First up I made another Magazine for the AR15. This one is the cast plastic type that varies from the other folded sheet metal variety. Came out very nice.

DockDappler_0000_Layer 4

Next up I got the Red Dot sight’s normals baked, and it came out right the first time. Now to add some normal details also known as greebles. I’ll add the detail work like screws, logo work, dents, scratches and other details. This will get finished tomorrow hopefully and then I’ll get onto the other Silencer.

DockDappler_0001_Background

Tom

Once again I’ve been working on improving our mesh baking/combining system by offloading its work onto background threads so it doesn’t block the main Unity process.
Unfortunately I’m a bit behind where I want to be again but making progress all the same. I’m now at the stage where I’ve got all our assets transferred over into the new format and all the in game systems have been switched over to the threaded baking although some bugs remain in the icon rendering system causing it to fall back to the default crate. The data is structured to support LODs but I still have to extend the priority system from vehicles to players, creatures and world items that choses the detail level based on how relevant they are (this can be more than just a distance based calculation, players aiming at you should have a higher priority just like occupied vehicles are higher priority). The other major job left in this system changeover is updating our model viewer. CowTrix has been doing some great work here while working on the item previews allowing you to load any mod’s asset bundle and preview any mesh attachment on any compatible skeleton. Converting over to the model viewer over to the new format has been pretty pain free so far, I’ve got a bug about custom colors not showing properly that I need to resolve as well as a bug with resolving dependencies across mods to find compatible skeletons and then it should all be functional. To finish the model viewer I’ll need to create some lighting snapshots from the live game so the model viewer will match the live game as closely as we can get.

Spencer

Is on Holidays this week, he will be back in action with more news for the next Dev Blog.

Hurtworld Update #76

Spencer

Hey folks. This week I’ve been making leaps and bounds on bringing content systems up to a playable state. I started the week working with cow_trix to bring the icon rendering to a decent level of output quality and managed to get them looking pretty nice as a baseline. Besides working on fixing the icon aliasing issues that cow_trix describes below, I also spent some time posing and configuring how things are rendered, I gotta say this system is awesome. Currently there is just a simple black glow around items to make them pop, but the system supports some pretty amazing stuff like animated glowing backgrounds on rare items, HDR rendering so we can do things like having blooming glows n stuff and eventually rotating 3d views of the icon.

hotbar

Lighting on icon rendering still needs work but am waiting on some bugs in world light bleeding in to be fixed before polishing that up.

Persistant world items
Now that everything renders as their correct world items, I really want to incorporate more things in the world that will remain where you left them in world item form instead of despawning. I envision things like your garage having a stack of wheels in the corner, your favorite rifle lent up against the wall etc. I think this will make the world feel a lot more interactive, and the lodding work Tom has done on the vehicles will soon be applied to everything, meaning we should be able to handle enormous amounts of world items without a perf impact.

Pasted image at 2017_04_06 09_42 PM

Content progress
I finished my first iteration of the prototype loot hunt progression this week. Part of this was going back through the map generation tools cow_trix built a few months back and designing up a procedural map that fits with this new prototype progression. Once I had a simple test biome generated in our nullius test map, I created an automatic creature level map clamping to each 5 levels (meaning creatures go up by 5 levels on each border).

Pasted image at 2017_04_10 08_33 AM

I would say as far as the test went, it was not great. Using blueprints as the loot hunt target at the early stage of the game feels pretty shit when you are gated by some mechanic until you can find a blueprint that gives you the stats that you want. I was ending up with 5 bow blueprints when all I needed was to be able to craft a better axe.

I was hoping to do away with the giant list of blueprints that you can craft from birth, but as this sucks I am going to push these mechanics further into the late game and we will ease into them. Another thing that seems like it should be a solid rule, is not to gate the player using a rare drop. Rare drops should give welcome bonuses, but not be the only way to progress.

The second problem I came across was it being very hard to tell how the difficulty of the world has progressed as you run through it. Having creatures with slightly different colors doesn’t give a good indication of how much they will mess you up if you fight them. MMOs usually allow you to look at an enemies level before fighting it, I’m not really a fan of this but might give it a try this week and see. Not to mention the aggro range on creatures being very long, you never really know who you are picking a fight with until they appear behind you. On this note I will be reducing the granularity of the creature spawn levels to be more hand crafted rather than a one size fits all approach. The good news is, handcrafted creatures with different properties are really easy to manage now due to the creature spawn mutator system, so not much time wasted.

Now that the game is playable again in survival, the iteration should be much faster. I will be rolling back to something closer to legacy for the next iteration and try using the new elements we have introduced as an extension to the original structure, rather than a replacement. While focusing on balancing for full loot.

Lastly here are a couple of the new biome experiments I liked throughout the week

Pasted image at 2017_04_10 06_51 AM

Pasted image at 2017_04_07 07_26 PM

Pasted image at 2017_04_10 07_00 AM

Mils

I climbed LOD mountain this week. I made 3 LOD’s for all the current AR15 models. We can now use these to test various systems that require LOD’s.  I completed all the Normal maps, UV layouts and texturing on a new Iron Sight for the AR15. This Iron Sight is very simplistic and gives the gun quite a different silhouette. I also got started on the next magazine, which is a cast plastic type, as opposed to the folded steel that the first magazine was made out of.

StackSight

I before I got onto the Simplistic Iron Sight (above) I got stuck into this more techy looking sight. I was going to go ahead and bring that up to finish, but Spencer said he wanted something simpler. I’ll get round to this one eventually though, so no work wasted here.

DraftSight

Tom

This week I continued my work on the mesh combining / baking system, ran some promising experiments with optimising our animation systems, setup our ragdolls to work the mesh combiner as well as a couple of bugfixes in ItemV2.
The work on the mesh combining system is coming along well although a little slower than I hoped. I’ve resolved the complexity around custom uv replacement and the threadsafe job dispatcher/consumer is working well but importing our assets into the new format, taking the system out of a testbed, integrating it with the game and updating our tools accordingly is still giving me some troubles. With that said I’m making good progress and am aiming to have it fully completed (with the LOD system) by the end of the easter break.
I ran some experiments optimising our animators using some inbuilt Unity functions where Unity will remove your skeleton hierarchy of game objects and instead write the transform matricies (basically the new position, rotation and scale of the bones after animation) directly to the mesh. This reduces a lot of load on the CPU around transform management and skin deformation (calculating how the bones move each vertex on the mesh). This system isn’t designed to handle runtime mesh generation (like our new mesh combiner) and its internal workings are hidden so my first experiments didn’t go so well but they did produce some pretty frightening characters.

HurtworldHorror
Luckily I got this under control and was able to optimise our baked meshes in a test environment and the results look promising. The shot below is from the profiler running 100 animated players, after optimization around 3ms is saved on the animator updates (the purple part, saved from transform management) and another 3ms is saved from mesh skinning (the green part).
AnimatorProfiling

TehSplatt

So after sorting out my workflow for sculpting and baking for Hurtworld last week, this week was spent going over a few different levels of texture detail before landing on one that looked good in game, the hard part is adding enough detail to define a material without adding to much causing the normal map to become noisy and distracting in game. After a day and a half of trial and error getting the vest in game and on the player it read well and looked decent with the basic textures. Today I got used to setting up my textures for RGB masking and had to beat out a few texturing habits I still have from working on mobile games. Due to needing 4 colour channels but only having 3 we used one of the colour channels at 50% of itself throughout the camo patterns, as most camo consists of 2 values of the same colour, which worked out really well and makes choosing good looking colour schemes a bit easier. These were some of the basic colour schemes I made using a toned down version of our colour masking shader. A lot of potential for good looking unique colour schemes.

MilitaryVest_ShapesandColours

I also spent a day capping items of clothing (the caps are in red) so that when they are rendered for icons or dropped in the world you can’t see massive holes in them that would appear see through due to 1 sided faces. Ignore the red you can see clipping through the clothing, that’s just Maya view port errors.

Clothing_Caps

Cow_Trix

Hey folks! This week I’ve mostly been fixing bugs in the new item rendering and world item system, as well as playing a bit more with it and seeing what it can do. I implemented a pretty cool icon effects system, which is a nice little system for blitting a rendertexture through arbitrary amounts of image effects. With this, we can add glows, drop-shadows, backgrounds, foregrounds, pretty much whatever we want! I’m still working out the best way to handle animated effects without bringing FPS to a halt. More on this soon!

So one issue we found with the icon rendering was trouble blending a texture into an arbitrary background. We found that the camera background would bleed into the image when we let it sample bilinearly. This created a “halo” around the render of the background color, even at native resolution – you can see this below where we’ve changed the background color to magenta to make it more obvious. We spent a bit of time figuring out a good solution to this issue. We figured out that the only real way we could prevent the background color from bleeding in was to sample the rendertexture in point mode, which means we don’t blend between pixel data. However, this also means that we get some pretty bad aliasing on the icon, especially around the edges. So we pretty much wrote a custom downsample shader that does what a normal bilinear sample does, but is smart enough to premultiply alpha so we don’t get any background bleed. Check it out below:

0

As well as fixing a bunch of bugs, I played around with how blueprints could appear in the world. You can see here a prototype where hovering over a blueprint shows a “hologram” of the item you craft with it.

12

Dev Blog